S.O.L.I.D Principles ?

S.O.L.I.D Principles ?

1) Single Responsibility Principle : SRP

” A CLASS SHOULD HAVE ONLY ONE REASON TO CHANGE. ”

Every module or class should have responsibility over a single part of the functionality provided by the software, and that responsibility should be entirely encapsulated by the class.

single responsibility principle
Single Responsibility Principal

In any enterprise software application development when we design and develop software systems, we need to account the below factors during the development cycle.

  • Maintainability
  • Testability
  • Flexibility and Extensibility
  • Parallel Development

SOLID Principles and Design Patterns plays a key role in achieving all of the above points.

In Single Responsibility Principle,

  • Each class and module should focus on a single task at a time.
  • Everything in the class should be related to that single purpose.
  • There can be many members in the class as long as they related to the single responsibility.
  • With SRP, classes become smaller and cleaner
  • Code is less fragile

2) Open Closed Principle : OCP

” open for extension, but closed for modification. “

In object-oriented programming, the open/closed principle states that “software entities such as classes, modules, functions, etc. should be open for extension, but closed for modification”.

Open Closed Principle

Which means, any new functionality should be implemented by adding new classes, attributes and methods, instead of changing the current ones or existing ones.

Implementation guidelines :

  • The simplest way to apply OCP is to implement the new functionality on new derived (sub) classes that inherit the original class implementation.
  • Another way is to allow client to access the original class with an abstract interface.
  • So, at any given point of time when there is a requirement change instead of touching the existing functionality it’s always suggested to create new classes and leave the original implementation untouched.

3) Liskov Substitution Principle: LSP

” Objects of a superclass shall be replaceable with objects of its subclasses ”

Substitutability is a principle in object-oriented programming and it states that, in a computer program, if S is a Subtype of T, then objects of type T may be replaced with objects of type S.

Which means, Derived types must be completely substitutable for their base types.

More formally, the Liskov substitution principle (LSP) is a particular definition of a sub-typing relation, called (strong) behavioral sub-typing.This Principle is introduced by Barbara Liskov in 1987 during her conference address on Data abstraction and hierarchy.

This principle is just an extension of the Open Close Principle.

Liskov Substitution Principle

4) Interface Segregation Principle : ISP

” no client should be forced to depend on methods it does not use “

This principle describe advantages of having many small interfaces based on groups of methods with each one serving one sub-module Instead of one large interface .

 Interface Segregation Principle
Interface Segregation Principle

This principle(Interface Segregation Principle) was first used and formulated by Robert C. Martin while consulting for Xerox.

When the software grows eventually Easier to violate the concept, especially when the new requirements arise and have to add more and more functions.

Splitting larger interfaces into individual components and implementing classes that only applies to the methods are advantages of it.

case study :

  • Xerox corporation manufactures printer devices.In their development process, they had to build a new printer with adding new features compared to a normal printer.They are the printer should be able to handle multiple tasks such as faxing and stapling along with normal printing tasks.
  • The device software was started to be deployed .
  • During the development, It became so difficult to modify even simple changes and it was much time consuming.

Solution :

  • To prevent this problem Interface segregation principle was suggested by Robert C Martin.By using this principle of interface segregation above problem can be overcome.

5) Dependency Inversion Principle : DIP

High-level modules should not depend on low-level modules. Both should depend on abstractions

Dependency Inversion Principle

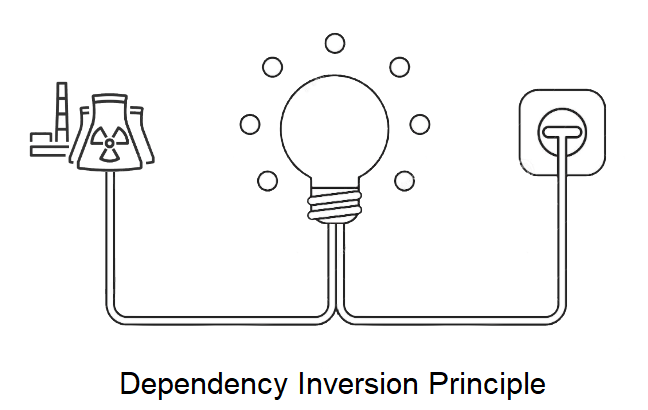
High-level modules should not depend on low-level modules. Both should depend on abstractions. and Abstractions should not depend on details. Details should depend on abstractions.

To simplify this we can state that while designing the interaction between a high-level module and a low-level one, the interaction should be thought of as an abstract interaction between them.

Dependency Inversion Principle can be achieved by following both Open/Closed Principle and the Liskov Substitution Principle.

Thank You!

GIT and VCS

GIT and VCS

What is Version Controlling?

Version control , it is control changes of source code over the time. It is manage every version of your application. Using VCS you can go back to previous version as your wish.

For example think, Now your in version 5 of your application but according to some reason you want to go to the version 2. Is it possible? With VCS it is possible. VCS maintain every version of your application. So you can simply move to the previous version and Also earlier version from previous version.

Also help with VCS we can work on same project with many people.That’s mean every one can update the main code without any issues. Anyone can do changes, VCS manage every changes that they did.

How do we identify changes? well, Changes identified using a revision number. Every revision keeps a record of the changes of the time and the person who done the changes.

How Version Control Work?

In Software development industry they work as a team. That means some number of developers work on the same project.So they continually write new codes and change the existing source code.The code for a project typically organized in a folder structure or “file tree”.

Can you imagine how to work as a team on a same project without version controlling…??

Benefits of having Version Control

Without Version controlling it’s very risky to work on same project. There is some benefits of VCS.

  • Access control
  • Enable collaboration
  • Enhance team communication
  • Reduce development errors and conflicts.
  • Easier backups and centralized source code repository.
  • It is Improves team productivity .

Version Control System

It is allows users to track the changes and help to get above mention benefits.

Examples for Version Control Systems :

  1. GitHub
  2. GitLab
  3. Beanstalk
  4. PerForce
  5. Apache Subversion
  6. AWS CodeCommit
  7. Microsoft Team Foundation Server
  8. Mercurial
  9. CVS Version Control (Concurrent Versions System)
  10. Bitbucket

GITHUB

GitHub is a web based service for version control using Git. Github is nothing but the hosting service where we store our git repositories. Basically, github is a social networking site for developers. You can look at other people’s code, identify issues with their code and even propose changes.

github
GitHub is the famous Version Control System

Basic Terminology

  1. Repository
    • A Git repository , or a repo is a folder that you’ve told Git to help you track the file changes.
  2. Branch
    • A branch is an independent line of development. We can also it’s consider as a brand new working directory.
  3. Fork
    • It is copy of another repository that belongs to the another person.Now you able to develop that project without affecting original repository.
  4. Commit
    • It is a set of changes to a file. Every time you save, it creates a unique ID which helps it keep track of history.
  5. Master
    • The default development branch.Whenever You create git repo, a branch name master is created which becomes default active branch

Why GitHub

  • Faster comparing to other systems
  • Supports multiple protocols
  • Distributed version control system
  • Free and open source

Thank You!

What is React JS?

What is React JS?

Introduction

React, It is a very famous JavaScript libraries used for building complex user interfaces.It is created by Facebook in May 29, 2013. Nowadays 8789 top fortune companies are used react. For example Facebook itself, Netflix, Twitter, Uber, Airbnb etc.

When it compared with Angular, it is a framework but React is a library.not a framework.It is open-source project created by facebook. It used to create the view layer of an MVC application(Model View Controller).

What you need to know

When we look about JavaScript in distance it seems very difficult. But when give a try on it actually it is very easy to learn. All it does is creating DOM(Document Object Model) elements in form of components by using the virtual DOM.

When some one try to learn React he/she should know these skills mention in below:

  1. Basic familiarity with HTML5 & CSS
  2. Basic knowledge of JavaSCript
  3. Basic understanding of the DOM
  4. Familiarity with ES6 syntax and features
  5. How to use npm out of the nodeJS

React basic Concept

Fig 1:Basic Concept of react

React renders HTML to the web page by using a function called ReactDOM.render().

Creating React elements:
  1. Creating ES6 module pattern,we are importing our React and reactDOM from the downloaded packages into our script.
  2. In above figure(Fig 1) we are creating a component named Test using ES6 class feauture.The class is inherited from React in-built component class.Observe the ‘extends’ keyword.
  3. React’s render method returns on HTML element.This here is called JSX.

ReactDOM.render() Method :
Fig 2: render() Method

ReactDOM.render() function take two arguments, HTML code and an HTML element.The purpose of the function is to display the specified HTML code.

In our case, the ”<p> Hello World! </p>” inside the specified HTML element.This ”<p>Hello</p>” element is to be displayed inside the second argument(root).The root element is an HTML tags in the index.html page shown in next figure(Fig 3).

Fig 03: index.html

The index.html generated by create react installation has a <div> with the id of ‘root’. This is where the ReactDOM.render() method attaches our jsx components.

Click Here to learn React

Introduction to Node.js

Introduction to Node.js

In 2009 Ryan Dahl was developed the Node.js. Now latest version is 12.16.1(includes npm 6.13.4). According to the official documentation of Node.js, it describe as follows-

Fig 1: Definition of Node.js in Official documentation

Node.js is cross-platform run time environment for developing server side and as well as networking application.Also it is open source.Node.ja application are written in JS and can run within the Node.js runtime on OS X, Linux and windows.Also it’s provide library of various javascript modules.

Node.js = Run Time Environment + JavaScript Library

Fig 2: Concept of Node.js
Resources : Download Node.js

Node.js Features

  • Fast : In code execution Node.js library is very fast
  • Single Thread still Scalable : with event looping Node.js uses a single threaded model. It use non-blocking way and It makes the makes the server highly scalable.
  • Asynchronous and Event Driven
  • No Buffering
  • License

Places that can use Node.js

Fig 3: Use cases
  • SPA : Single Page Aplication
  • DIRT : Data Intensive Real-time Applications
  • Data Streaming Application
  • I/O bound Application
  • JSON APIs based application
Node.js ‘Hello world’ Example :
  1. First download and install the node.js in your computer.
  2. Then create a ”Test.js” Node.js file
  3. Add following code to the Test.js
Fig 4:Code segment
  1. After Open “Command Prompt”.
  2. Then navigate to the folder that contain “Test.js”.
Fig 5: Navigate to the folder
  1. Then type “node Test.js”
Fig 6: start server
  1. Now your computer act as a server.If anyone tries to access port 8080 they will get “Hello World!” message.
Thank You!

Component Lifecycle in React

Component Lifecycle in React

mounting and unmounting

Components in React have a lifecycle of events that we can easily subscribe to by defining the associated methods on our component definition object. Let’s go ahead and update our previous example to see this feature in action.

HelloMessage Component

Here we have updated our HelloMessage component to log to the console the following three React component lifecycle events:

  • componentWillMount
    • This event will be called right before a component mounts
  • componentDidMount
    • This event will be called right after a component mounts
  • componentWillUnmount
    • This event will be called right before a component unmounts

We are also logging our render method to the console so that we can see when the various lifecycle events occur relative to render.

Let’s also update our HelloReact component to add a button that will reload our HelloMessagecomponent allowing us to see what happens when it unmounts. We’ve added this button to the render method shown in the following code:

And then let us add a reload method to our HelloReact component that will call React.unmountComponentAtNode which will unmount our component. We then call ReactDOM.render to mount our component.

Now let’s go ahead and run the code in JsFiddle and open our browsers debugging tools (F12 in Chrome) so that we can see the console output. After running the code we see the following output:

And as we can see we get a call to componentWillMount right before Render is called and then we get a call to componentDidMount right after render is called. This gives us an opportunity to run code both before and after our render method. Next let’s add a First Name and we can see what happens in the console as shown below:

We get one more call to render but componentWillMount and componentDidMountare not called because our HelloMessage component is already mounted and we are simply causing React to call the HelloMessage.render method. Let’s set a last name and look at the console output:

Probably no surprise here but we find that render is called again but that none of the lifecycle events are called. Next let’s click the Reload button and look at the following output:

Now we see that componentWillUnmount is called as our component is unmounted and then we repeat the same sequence we saw earlier as the component is mounted again.

Thank you!

HTTP request methods

HTTP request methods

What is HTTP ?

HTTP stand for Hyper Text Transfer Protocol And it’s basically responsible for communication between client and server. Using HTTP request and response they communicate with each other.

For example:

  • Loading pages
  • Form submit
  • Ajax calls

Next important thing is HTTP is stateless. That’s mean every request is completely independent. It’s similar to transaction. Other thing is we can enhanced user experience using programming, Local storage , Cookies , Session etc.

HTTP Methods?

Whenever request made to a server it has some kind of method attached to it. That method indicate the action to be perform for a given resources. Except some common features Each of them implements a different semantic.

Common features : a request method can be safe, idempotent, or cacheable.

  1. GET
    • Responsible of GET method is retrieve data from the server.
    • GET method only read the data, not change it.
    • GET returns a representation in XML or JSON
    • If error occur return 404 or 400 error.
  2. POST
    • Responsible for submit data to the server.
    • Something like to ‘ CREAT ‘.
    • If creation is success return 201 HTTP status.
    • If error occur return 404 or 409 error.
  3. PUT
    • Responsible for update data that already in server.
    • Same as UPDATE.
    • In some case PUT can use to create resource.
    • If PUT is success return 200 or 204.
  4. DELETE
    • Responsible for DELETEs data from the server.
    • If it is success return 200 along with response body.
    • If it is failed return 200 or 204.

Thank You!

What is EXPRESS.JS?

What is EXPRESS.JS?

Express.js, it is a web framework and based on the core Node.js http module and Connect components. We also called middleware for those component. In other word It is extensible,also minimalist web framework built for the Node.js ecosystem. We able to create a web server that is more flexible, readable and maintainable using Express.

How to setup express?

  1. Create a directory that you wish to hold this project.
  2. Open your terminal and go inside to that created directory.
  3. Then initialize the NPM to create package.json file.
  4. After install Express(as a dependency).
How setup express

Hello World Example!

  1. Create a new file and rename it as server.js (this file hold the code)
  2. In that file write below code.
‘Hello world’ example
  1. To start the server run below code in terminal
To start the server

Now you can see the output. It display ‘hello world’ in screen on localhost:3000 .

Output

How it works?

In the first line of the code require express that installed earlier part(via NPM). Then setup our express application in second line.

First Two lines

Then move to the ‘app.listen()‘ . It tells server to listening for connection on port 3000.This is the reason Output display in ‘localhost:3000’. When server is listen to the port callback called and logs ‘express intro running on localhost:3000’ in terminal.

app.listen()

app.get() is responsible for create route handler to listen for GET request.In this case listening get request on localhost:3000. Similarly If you want to listen POST request , then we can use app.post().

Thank You!

GROUP PROJECT

GROUP PROJECT

Group Details

  • IT18001808 – S.W.P.N.M.Weerasinghe (Leader)
  • IT17084796 – H.S.D.N. Gunasekara
  • IT18012866 – L.G.I. Sathsara
  • IT18066944 – R.M.D.D.Rajapaksha

About Project

Branch Person who handle the branch
masterS.W.P.N.M.Weerasinghe
(Leader)
dilanjanR.M.D.D.Rajapaksha
isuruL.G.I. Sathsara
duliniH.S.D.N. Gunasekara
Person who handle the branch